quarta-feira, 30 de janeiro de 2013
NECESSAIRE BOX M
Vídeo do Passo a Passo do Programa Atelê na TV...
Pessoal
aqui está um “vídeo caseiro” (peço
desculpas por uma pequena falha técnica aos 4 minutos da filmagem rs...) do meu
passo a passo apresentado no Programa Ateliê na TV no dia 22/06/2012.
Em
breve eles irão disponibilizar o vídeo na íntegra no site, que por enquanto
está apenas com a parte escrita (lista de materiais e modo de execução), mas
para “quebrar um galho” trouxe aqui
para vocês que não puderam assistir ou que gostariam de ver novamente!
Abaixo também segue o molde
da peça, mas ATENÇÃO: o desenho está
SEM ESCALA, é preciso apenas
utilizar as medidas e preparar seus próprios moldes ok!
Grande beijo
Iara Passerotti - IP
Handmade
COLCHA TILDA.
PAP: Colcha Tilda
Boa tarde pessoal....
Finalmente chegou sexta hehehe!
Muita gente me pergunta sobre a Colcha Tilda linda maravilhosa que todos amam,
então procurei tudo que tinha na internet sobre ela e trouxe para vocês...
Essa colcha está no livro Tilda´s Haus
Esses são os esquemas e moldes que achei....
Espero que gostem e divirtam-se e por favor quem conseguir fazer
mostra qui para gente ;)
segunda-feira, 28 de janeiro de 2013
quarta-feira, 23 de janeiro de 2013
estojo redondo
ikat bag blog for more (check out the “Most Visited” section in her left sidebar, and her patterns too).
 From LiEr: I used home decor weight fabric and/or duckcloth/canvas
for my pencil cases– They make a sturdy product. However, it can be
tricky to manipulate in many layers and around small circumferences if
you are not used to working with these. You might also use thinner
fabrics with appropriate interfacing (if preferred).
What you need (1/2″ seam allowance included in all pieces):


Step 1
 Fold the lining rectangle in half, right sides together, so the
shorter side is along the fold. You will get a folded rectangle of
dimensions 9.5″ x 5.25″. In the photo, the fold is at the bottom.
Sew, with backstitching, a line 1″ from each short side and 1/2″ from the top of the rectangle as shown. You have made a stout tube, attached only at the ends, with a (approximately) 6.75″ opening for the 7″ zipper. The zipper is shown for reference.
Step 2
 Press open the seam allowance of this zipper opening.
Step 3
 Make 1/4″ – 3/8″ snips/cuts along the seam allowance of both ends.
Notches are shown purely for visibility in the photo. Do not cut all the
way to the stitching line (shown in purple ink dashes).
Step 4
 Pin one lining circle to one open end of the tube, so the right side
of the circle faces the right side (inner surface) of the tube.
Step 5
 With the circle below and the tube on top as shown, sew all around,
using 1/2″ seam allowance, to attach the circle to the end of the tube.
Spread the snipped seam allowance of the tube smoothly around the
circumference of the circle as you sew.
Repeat for the other end and the other circle.
Step 6
 This is the view of the circular end of the tube. It doesn’t matter
if the stitching line is a little crooked/wavy. Trim this seam allowance
now to 1/4″ to reduce bulk.
 This is the completed lining of the pencil case. Set it aside.
MAKING THE OUTER LAYER
Step 7
 Sew the pieces of interfacing to the wrong sides of the corresponding
pieces of outer fabric as shown. Sew close to the edge (about 1/4″ or
less) so that this stitching line remains hidden within the seam
allowances when the pieces are later assembled into the pencil case.
Step 8
 Repeat Step 1 with the outer fabric rectangle to make a stout tube with an opening for the zipper (shown again for reference).
MAKE THE PIPING:
Step 9
Remove the regular presser foot and replace it with the zipper foot. Move the needle to the outermost position.
 Fold one piece of piping fabric over one piece of piping cord and
line up the long edges of the fabric. Using a long stitch length (you
will be unpicking a few stitches later), hug the piping cord with the
edge of the zipper foot as shown, and sew close to the cord to enclose
it within the fabric. Sew all the way to the end of the fabric and do
not backstitch.
ATTACHING THE PIPING
Step 10
 Line up the seam allowance of one open end of the tube with the seam
allowance of the piping and pin in place all around the circumference.
Step 11
 Using a regular stitch length and beginning about 1″ from the end
(hereafter referred to as the “head end”) of the piping, sew close to
the piping cord to attach piping to the circumference of the open end of
the tube.
 About 1.5″ from the other end (hereafter referred to as the “tail
end”) of the piping, stop with the needle in the down position.
Step 12
 Using the seam ripper, unpick the long stitches (that you sewed in
Step 9) in this remaining 1.5″ of the piping, to expose the cord. Trim
away enough cord so that it (the cord) just meets the head end of the
piping (shown pulled away) and does not overlap. Do not trim the piping
fabric – this WILL be overlapped and needs to remain uncut.
Step 13
 Fold in about 1/2″ of the piping fabric as shown.
Step 14
 Release the head of the piping and tuck it into the tail end as shown. The ends of the cord itself should meet and not overlap.
Step 15
 Fold the piping fabric of the tail end over the head end, and
continue sewing to finish attaching the piping to the open end of the
tube.
FINISHING THE OUTER LAYER
Step 17
 Snip the seam allowance in the same way as in Step 3.
Step 18
 Pin one of the outer circles to the open end of the tube, right sides
facing, and sew to attach in the same way as in Steps 4 and 5. The
zipper foot will enable you to sew very close to the piping cord . You
can use the visible stitches from Steps 11-16 as a guide – just sew
directly on top of them.
Step 19
Trim the seam allowance to about 1/4″ to reduce bulk and turn right side out to check that the piping is sewn correctly.
Step 20
Repeat Steps 10-19 for the other outer circle and the other open end of the tube.
 The outer layer of the pencil case is completed!
ATTACHING THE ZIPPER
Step 21
 Insert the lining from Step 6 (wrong side out) into the outer layer
from Step 20 (right side out) and line up the ends of the zipper
opening.
Step 22
 Open the zipper and insert one side (right side up) between the two
layers as shown. The zipper coils should be flush with the folded edges
of both layers.
 Hand baste the zipper in place all around the zipper opening.
Step 23
 Turn the entire pencil case inside out and leave the zipper
completely open. Change the position of the needle and alignment of the
zipper foot accordingly and, beginning in the middle of the pencil case
(not the ends) sew about 1/4″ from the coils of the zipper to attach all
around the zipper opening. Take your time to do this, particularly if
you are using thick fabrics, stopping to turn the fabric often, and
always with the needle in the down position.
Step 24
 When the zipper is completely attached, remove the basting stitches and turn right side out.
 The pencil case is completed!


What you need (1/2″ seam allowance included in all pieces):

- For the Outer Layer:
- One rectangle 9.5″ x 10.5″ in outer fabric
- One rectangle 9.5″ x 10.5″ in heavy sew-in interfacing
- Two circles 4″ diameter in outer fabric
- Two circles 4″ diameter in heavy sew-in interfacing
- One 7″ zipper
- 19″ (approximately) of 1/4″ piping cord, cut into two equal pieces
- Two rectangles 10.5″ x 1.5″ piping fabric

- For the Lining Layer:
- One rectangle 9.5″ x 10.5″ in lining fabric
- Two circles 4″ diameter in lining fabric
- Also needed: a sewing machine with a regular presser foot, a
zipper foot, coordinating sewing thread, a needle for hand-basting and a
seam ripper.
Step 1

Sew, with backstitching, a line 1″ from each short side and 1/2″ from the top of the rectangle as shown. You have made a stout tube, attached only at the ends, with a (approximately) 6.75″ opening for the 7″ zipper. The zipper is shown for reference.
Step 2

Step 3

Step 4

Step 5

Repeat for the other end and the other circle.
Step 6


MAKING THE OUTER LAYER
Step 7

Step 8

MAKE THE PIPING:
Step 9
Remove the regular presser foot and replace it with the zipper foot. Move the needle to the outermost position.

ATTACHING THE PIPING
Step 10

Step 11


Step 12

Step 13

Step 14

Step 15

FINISHING THE OUTER LAYER
Step 17

Step 18

Step 19
Trim the seam allowance to about 1/4″ to reduce bulk and turn right side out to check that the piping is sewn correctly.
Step 20
Repeat Steps 10-19 for the other outer circle and the other open end of the tube.

ATTACHING THE ZIPPER
Step 21

Step 22


Step 23

Step 24


segunda-feira, 21 de janeiro de 2013
almofada
< Voltar


Patchwork / Patchwork Adicionar ao favoritos
Almofada de cabeceira de patchwork
Texto: Oscar Neto l Fotos: Mônica Antunes e André Wittner (passos) l Produção: Cristiane Alberto l Criação e execução: Cissa Mesquita (com produtos Brother) l Agradecimento: Art de Lange (ambientação e adereços)
O encosto de cabeceira de berço, confeccionado
por Cissa Mesquita, recebeu apliques com cores delicadas e foi
preenchido com plumante. Tudo por um sono nas nuves
35 0
9 4

Materiais utilizados no passo a passo de
patchwork:• Tecido 100% algodão nas cores creme, rosa,
caramelo e marrom chamuscado
• Retalhos de tecido florido, vermelho e verde-claro
• Máquina de cortar tecido
• Papel termocolante
• Linha de costura nas cores rosa antigo e caramelo
• 1 kg de plumante
• Tesoura
• Caneta
• Ferro de passar
• Máquina de costura
• Molde

A almofada decorada com flores de feltro tem custo de R$ 8,00 e pode ser vendida por R$ 40,00.
Onde encontrar:Art de Lange - (11) 3081-3985 e 3061-3159, www.artdelange.com.br
Cissa Mesquita - Tel.: (19) 3224-7056, www.ateliecissamesquista.com.br
Brother - www.ateliecissamesquista.com.br
• Retalhos de tecido florido, vermelho e verde-claro
• Máquina de cortar tecido
• Papel termocolante
• Linha de costura nas cores rosa antigo e caramelo
• 1 kg de plumante
• Tesoura
• Caneta
• Ferro de passar
• Máquina de costura
• Molde

A almofada decorada com flores de feltro tem custo de R$ 8,00 e pode ser vendida por R$ 40,00.
Onde encontrar:Art de Lange - (11) 3081-3985 e 3061-3159, www.artdelange.com.br
Cissa Mesquita - Tel.: (19) 3224-7056, www.ateliecissamesquista.com.br
Brother - www.ateliecissamesquista.com.br
Passo a Passo


Transfira o molde do cupacke para os tecidos creme e
marrom chamuscado. No caso da cobertura do cupcake, transfira o risco
diretamente para o papel termocolante e, sem seguida, fixe-o sobre o
tecido rosa. Com o auxílio do cortador de tecidos, corte todos os
moldes. Com o ferro, fixe o papel termocolante no verso dos retalhos
floridos. Desenhe flores sobre o papel e recorte os moldes.


porta lingerie
< Voltar

Patchwork / Patch Apliquê Adicionar ao favoritos
Porta-lingerie de patch apliquê
Por Cristiane Arliani | Fotos: Alexandre Diniz | Produção: Luciana Martins | Criação e execução: Valéria Spachi
Este estojo é a pedida certa para guardar as lingeries para que não fiquem perdidas na mala
50 1
4 2

Material utilizado no passo a passo de patch apliquê:
• 35 x 16 cm (parte C) de fustão branco
• 35 x 39 cm (parte D) de tecido de algodão estampado com fl ores
• 10 x 13 cm (parte A), 10 x 12 cm (parte B), 35 x 76 cm (parte E), 33 x 2,5 cm (2 vezes – alças) de tecido de algodão vermelho com poás
• 35 x 48 cm (parte F) de manta acrílica
• 15 cm de entretela termocolante
• Lápis
• Tesoura
• Linha Cadena para costura
• 2 botões quadrados brancos pequenos
Modo de fazer:
Transfira os riscos para a entretela termocolante. Com o auxílio da tesoura, recorte os motivos, deixando uma margem de 0,5 cm. Coloque a entretela recortada anteriormente sobre o tecido, posicione-a e fixe-a com o auxílio do ferro de passar. Recorte o motivo. Retire a película de proteção da entretela e aplique no tecido destinado à frente do porta-lingerie, acompanhando a sequência de letras A e B. Costure com ponto de casear feito à máquina.
Montagem da peça – costure a aba na borda da frente. Monte o forro dobrando as 2 partes de 14 cm e pesponte a borda. Coloque a parte externa sobre a manta acrílica e trabalhe o quilt livremente. Costure as laterais e as bordas do fundo. Costure as laterais do forro prendendo as laterais da divisória. Coloque o forro dentro da bolsa e costure unindo à borda da frente e à aba, formando um viés bem estreito. Dobre o tecido reservado para a alça ao meio pelo avesso na maior extensão e pesponte. Vire o tubo para o direito e faça o acabamento nas pontas. Monte a outra alça da mesma forma.
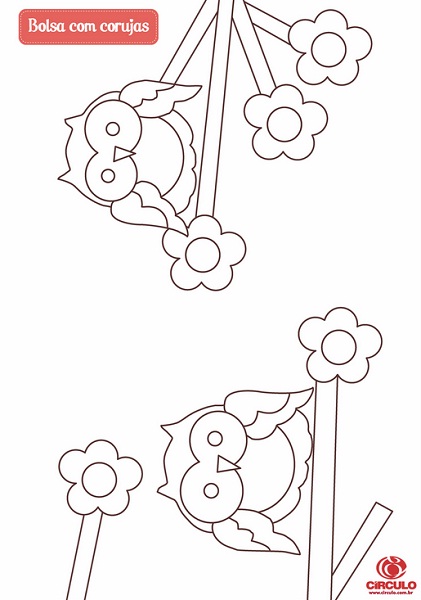
bolsa coruja
 Receita: Bolsa de Corujas

Materiais:
- 50 cm Tecido Círculo Floral rosa;
- 60 cm Tecido Círculo Micro poá rosa ( forro e faixa da parte frontal);
- 20 cm Tecido Círculo Micro poá verde;
- 25 cm Tecido Micro poá bege;
- 1 m fibra acrílica;
- 50 cm termo colante;
- Retalhos coloridos para a aplicação;
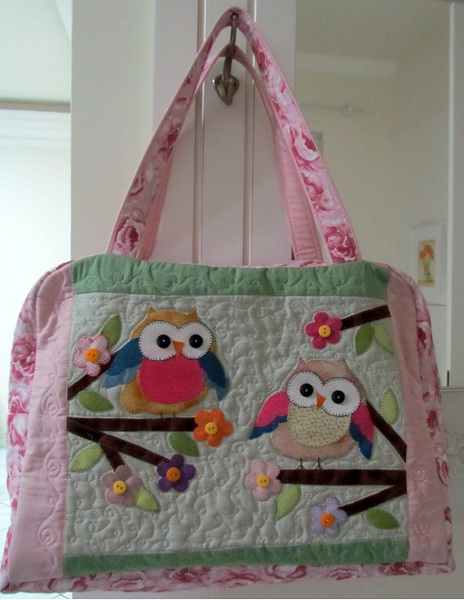
FRENTE DA BOLSA
Corte:
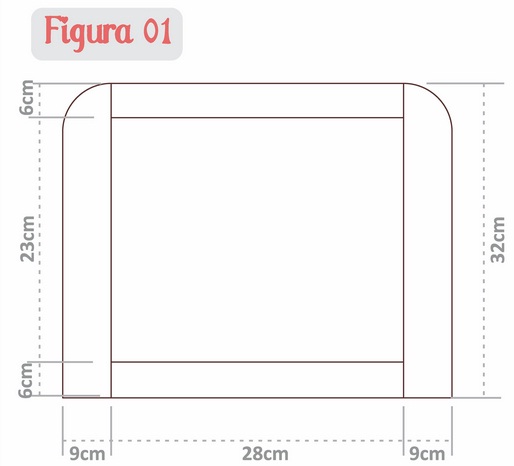
Tecido bege – 28 cm x 23 cm
Tecido verde – 28 cm x 5 cm (2 vezes)
Tecido rosa – 30 cm x 9 cm
Monte conforme a figura 01 (observe a foto da bolsa)
Com a parte frontal costurada, faça a aplicação conforme o molde. Arredonde os cantos superiores. Faça o sanduíche (frente + fibra + forro) e quilte.
COSTAS DA BOLSA
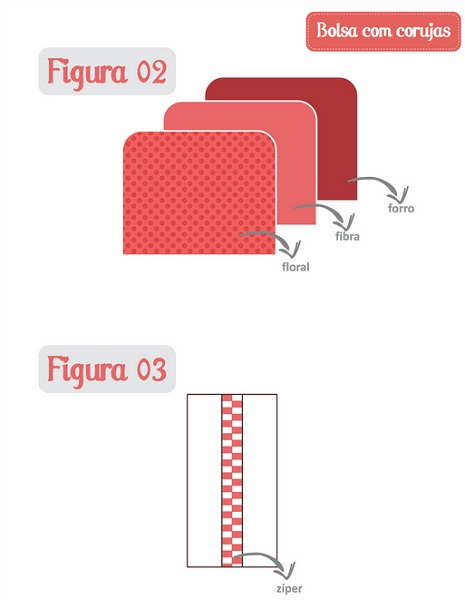
Corte tecido floral, fibra e forro nas medidas de 43 cm x 32 cm.
Monte o sanduíche o quilte (figura 2).
Arredonde os cantos superiores igual a parte frontal.
FUNDO E LATERAIS DA BOLSA
Corte o tecido floral, a fibra e o forro nas medidas de 95 cm x 15 cm faça o saduíche e quilte.
ABA PARA ZÍPER
Corte o tecido floral, a fibra e o forro nas medidas de 75 cm x 15 cm. Faça o sanduíche e quilte. Depois de quiltado, corte ao meio, ficando duas peças de 7,5 cm x 75 cm.
Corte 2 faixas de 6 cm x 75cm, dobre ao meio no sentido do comprimento e costure como viés nas duas abas do zíper. Costure o zíper encostado do viez, conforme figura 03.
ALÇAS
Para as alças corte 2 vezes na medida de 10 x 65 , dobre ao meio (direito com direito) e costure sobre a fibra. Corte os excessos da fibra, desvire e rebata a costura dos dois lados.
Posicione as alças e fixe, nas partes da frente e costas da bolsa.
MONTAGEM DA BOLSA
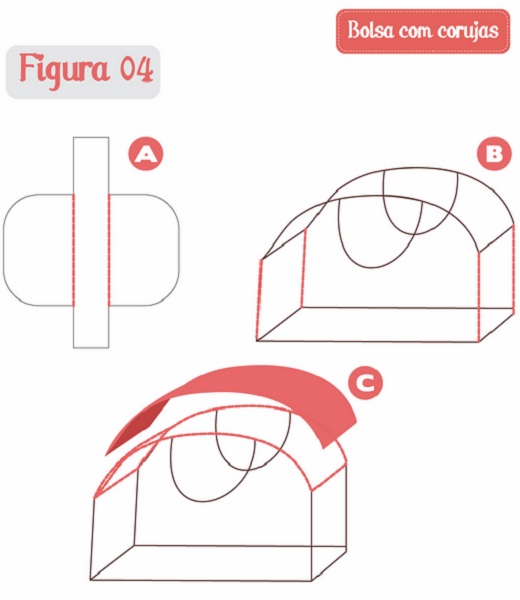
Monte a bolsa conforme esquema da figura 04 com o avesso para fora.
Depois de montado, abra o zíper, desvire a bolsa e confira se a montagem ficou correta.
Agora é só fazer o acabamento com viés por dentro.
Artesã: Solange Radloff
Assinar:
Comentários (Atom)


